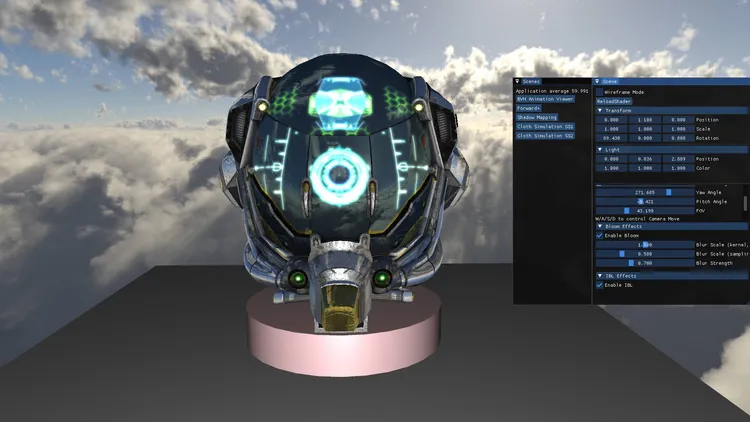
Bloom Effects in OGL Renderer
Rendering
Bloom Effect is a sophisticated technique, pivotal in adding depth and vibrancy to graphics. By understanding its intricacies and implementing them diligently, one can achieve stunning visuals.
Overview Video
Implmentation
Bloom Effect is a multiple passes application. It at least has two passes:
1 MRT(Multiple Rendering Targets) Pass
Unlike Vulkan, OpenGL lacks an exact concept of Render Pass. It only provides Framebuffers (FBOs), somewhat analogous to a combination of Render Pass and Framebuffers in Vulkan. Personally, I prefer the term Pass over FBOs as it feels more intuitive.
The MRT Pass renders multiple off-screen images termed the “geometry buffer” or G-Buffer. Ensuring strict correspondence between the Framebuffer and Shader Outputs is pivotal.
- MRT FBO
mrtFBO = std::make_shared(w_width, w_height, AttachmentFormat::RGBA16F, 5, true);- MRT Fragment Shader Ouput
layout (location = 0) out vec4 FragColor;
layout (location = 1) out vec4 BrightColor;
layout (location = 2) out vec4 PositionColor;
layout (location = 3) out vec4 NormalColor;
layout (location = 4) out vec4 AmbientColor;
Within my PBR workflow, the emissive texture serves as the source for bloom effects, with the output slot for emissive color set to location = 1.
Post the MRT Pass, the Blur Pass should also utilize location = 1.
2 Gaussian Blur Passes
The quintessence of the bloom effect lies in blurring an emissive image, making it appear radiant. Some implementation use a single pass and use a 2D kernel multiple times. But most of implementations used 2 separate passes with a 1D gaussian blur kernel twice in horizontal and vectical.
Here I also used two passes in both directions.
To figure out Gaussian Blur, we need to talk about
Gaussian(Normal) Distribution
in advance.
The gaussian kernel serves as a convolution filter, adjusting the energy levels of each pixel. Visually, it resembles a bell-shaped curve with high central energy, tapering towards the edges. This approach efficiently facilitates blurring.

I prefer to comprehend this from energy perspective. The center has more light energy, so looks more bright.
Mathematically, this can be expressed as:

While there is a magic values in shader with not explainments in In the (LearnOpenGL)[https://learnopengl.com/Advanced-Lighting/Bloom] and (vulkan tutorial)[https://github.com/SaschaWillems/Vulkan/blob/master/shaders/glsl/bloom/gaussblur.frag].
uniform float weight[5] = float[] (0.227027, 0.1945946, 0.1216216, 0.054054, 0.016216);I guess it comes from some papers or articles but I cannot find references on pages. But in my implementation, I would like to provide more possibilties to adjust the kernel and find out differences. We support change the kernel value in the runime!
Below is my implementation:
// Function to compute Gaussian density in 1d
double gaussian1D(double x, double sigma, double mean = 0.0) {
    // Compute the exponent part of the Gaussian formula
    double exponent = -0.5 * Pow2((x - mean) / sigma);
    // Return the Gaussian value
    return exp(exponent) / (sqrt(2 * M_PI) * sigma);
}

// Template function to compute Gaussian kernel of given size in 1d
template<size_t KERNEL_SIZE>
constexpr std::array<double, KERNEL_SIZE> GaussianKernel1D(double sigma = 1.0) {
    // Calculate the center or mean of the kernel
    constexpr double mean = (KERNEL_SIZE - 1) / 2.0;
    std::array<double, KERNEL_SIZE> kernel;
    double sum = 0.0;  // For normalization

    for (size_t i = 0; i < KERNEL_SIZE; i++) {
        kernel[i] = gaussian1D(i, sigma, mean);
        sum += kernel[i];
    }

    // Normalize the kernel so that its values sum up to 1
    for (size_t i = 0; i < KERNEL_SIZE; i++) {
        kernel[i] /= sum;
    }
    return kernel;
}
While I used sigma = 1.0 as the default value and got the result as follows:
[0] = {double} 0.39894346935609776
[1] = {double} 0.24197144565660073
[2] = {double} 0.053991127420704416
[3] = {double} 0.0044318616200312664
[4] = {double} 0.00013383062461474178
It looks quite similar to the “magic number”. And I made a slider bar to adjust it, the result as follows:
While the target of the kernel value to sample are texture pixels, we use a float as uBlurScale to offset the distance on the texture.
Initially, I did this as horzoial and vertical two lines, like a cross,
    for( i : LOOP)
        vec2 offset = tex_offset * float(i * j);
    ...
    // H
    result += texture(uBlurSourceImage, TexCoords + vec2(offset.x, 0.0)).rgb * k_weights[j] * uBlurStrength;
    result += texture(uBlurSourceImage, TexCoords - vec2(offset.x, 0.0)).rgb * k_weights[j] * uBlurStrength;
    // V
    ...
Even with the loop, we are still do cross interpolation, I think it is not a good implementation:
It results in ugly lines while increasing the scale of texture offset. We can implement this way to get better interpolation results by assgining different weights! So , the code looks like this
    result += texture(uBlurSourceImage, TexCoords + vec2(offset.x,  -offset.y / 2.f)).rgb * k_weights[j] * uBlurStrength  / 2.f;
    result += texture(uBlurSourceImage, TexCoords + vec2(offset.x,  offset.y / 2.f)).rgb  * k_weights[j] * uBlurStrength  / 2.f;
    result += texture(uBlurSourceImage, TexCoords - vec2(offset.x,  -offset.y / 2.f)).rgb * k_weights[j] * uBlurStrength  / 2.f;
    result += texture(uBlurSourceImage, TexCoords - vec2(offset.x,  offset.y / 2.f)).rgb  * k_weights[j] * uBlurStrength  / 2.f;
It looks dummy but works good!
Another parameter is blur strength, which is a simple factor used to control the final color strength.
3 Summary
Bloom is first application I used MRT, though I first implementation is in Vulkan. And OpenGL is easier to implement features. In this implementation, I provided three factors to adjust the final effects. They are:
- kernel factor
- sampling scale
- blur strength They have been shown in the video.
Finally, one more important thing should be marked as TODO: Toon Mapping. That will invlove HDR Texture and color space, which should be another topic.